As a few of you requested the tutorial for the Christmas Bauble Cards here goes...

You will need:

You will need:
- a piece of white craft felt (acrylic)
- a piece of coloured craft felt (to match your colour scheme)
- a selection of coloured organza ribbons or strips of organza fabric
- pins and fabric scissors
- a sewing machine and machine threads (preferably polyester threads)
- a soldering iron (optional)
- a round metal template (I use a golden syrup lid)
- a small piece of ribbon
- a button, bow or other small trim.

Begin by arranging the ribbon/organza in overlapping rows on the white felt until you get a pleasing arrangement of colours. When you are happy with them pin in place up the sides as shown. There is no need for bondaweb or tacking.

With your machine set for normal sewing and with some matching polyester thread, secure the rows of ribbon/organza with rows of decorative stitches, removing the pins as you go. If your machine does not have any decorative stitches, rows of zigzag work as well and look just as pretty.

Continue to add parallel rows of stitching to build up a lovely rich surface pattern. Feel free to change your thread colour too. I used three or four colours.

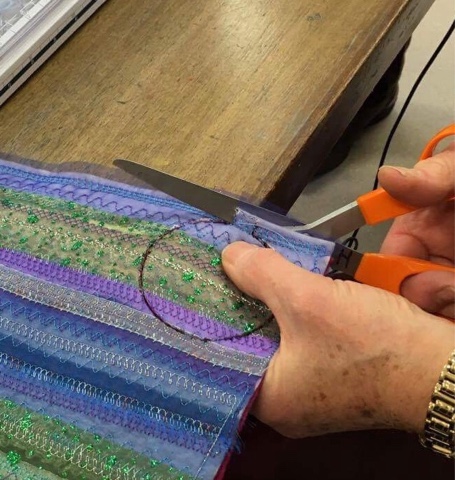
If you have a soldering iron, read on. If not I'll give you an alternative in a minute. Place your stitched felt on top of your coloured felt and and with your metal template very carefully cut out a circle with your soldering iron, remembering to leave a little tab at the top of the circle for hanging. Take care with the placement of your template... I managed to get nine ornaments from the one bit of stitched felt. Go slowly and mind your fingers!

The soldering iron should cut through the layers and seal the two different felts together giving you a neat backing. If your thread was not polyester the soldering iron may catch on the thread and not cut through properly but you can still mark out the circle this way and cut through most of it.

You will probably need to cut out the marked circles with a scissors where the soldering iron has not cut all the way through. If you do not have a soldering iron just pin the felts together and mark out circles on the reverse, cutting them out with scissors and keeping the layers pinned together.
In both cases the baubles look better with a neatened edge so starting at one side of the tab, stitch a zigzag stitch all the way around the edge of the bauble until you reach the other side of the tab. Don't worry about the tab as you won't see this on the finished bauble.
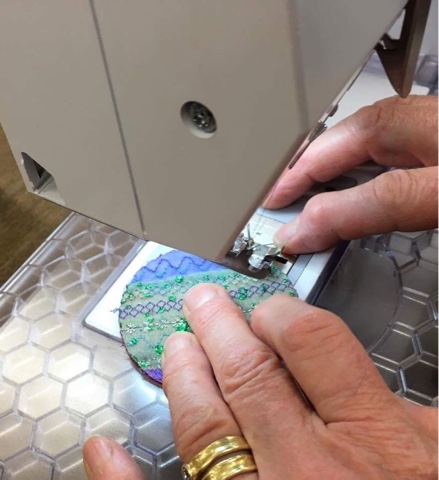
At this stage it should look like this. You can use the soldering iron to burn holes in the baubles to create more pattern, or alternatively you could stitch on some beads or sequins.

Tie off any loose ends and then stitch a short length of ribbon to the tab for hanging, covering the join with a pretty button or bow. You can then hang it on your tree or stitch it onto a card it with a couple of stitches at the top of the ribbon. Your card is now all ready to send!

Do let me know how you have got on and feel free to send me a photo of your finished results!


Thank you, can't wait to make some, when I have time!!
ReplyDeleteLike Penny, I am definitely going to make some of these...time - never enough of it. I have a second cousin coming to stay later this week (she lives in Canada and I haven't seen her for several years), I have two Christmas breakup lunches this week, and am hosting a birthday dinner for a Chinese friend. She is a student here in Auckland and turns 30 on Saturday. AND a very special person, a best friend;s daughter, turns 13 this week! I am leaving for Lawrence on 18 December and want to make a skirt before I go. I WILL find time to make the baubles. I will. Maybe in 2018. Thank you so much Gina. They are delightful.
ReplyDeleteThey really are quick to make... promise!
DeleteOne done! Yay! Pretty. Now off to bed before I fall over! I think i will get about 10 out of the piece I did.
DeleteExcellent! Well done 😁
DeleteThanks for that Gina...they are so pretty!
ReplyDeleteThank you! Easy when you know how - hadn't thought of it using acrylic felt and a soldering iron.
ReplyDeleteAlways easy when you know how! 😉
DeleteSo that's how it's done. Bit of an aha! moment there for me...Thank you.
ReplyDeleteI wouldn't be without my soldering iron or glue gun!
DeleteThanks Gina for generously sharing your tutorial. I think I definitely need to put a soldering iron on my letter to Santa Claus! Loving the daily posts. I'm waiting for 6 kg Seville oranges to be delivered- just WHY did I do it this side of Christmas?! xx
ReplyDeleteThese are so pretty and a great way of using up small amounts of ribbon and fabric too nice to put in the bin. Lovely cards for special people.
ReplyDeleteThey are delightful Gina. Thank you for the tutorial and I'm looking forward to finding some time to make a few.
ReplyDeleteThank you Gina. I have all the bits I need - just need to locate them! I'm looking forward to making some today- much more exciting than housework. Loving the advent posts. I have used your mince pie topping recipe since you first posted it - delicious! Sheila
ReplyDeleteHave fun! Xx
DeleteIt had never occurred to me to use a soldering iron on fabric - genius!
ReplyDeleteThe baubles are beautiful.
Never without a soldering iron nor glue gun!
DeleteThese are so pretty Gina!
ReplyDelete