Oh ye of little faith... I resisted temptation and spent a grand total of £6.50 whilst at the Quilt show yesterday. But that's a post for another day because today it's back to the sketchbooks and some stencilling!

First of all colour some pages in preparation. I've used some spent procion dye for this but any water based medium will work. Then you need to select a strong image from your previous pages that can be reduced to an outine shape. Draw this into some card. Cereal packet weight will be fine. If you want to do a lot of stencilling then it's worth cutting your stencils from acetate sheets but I find card works well enough for a few applications.

Carefully cut around your outline. It's worth doing this carefully because then you can use the cut out shape too.

Position your stencil onto the page. I use a little bit of spray mount to hold it in position because I never seem to be able to stop the stencil slipping if I try to hold it in place, although I'm sure some masking tape would work too.

For the first exercise I've used Markal paintsticks (Shiva sticks) which are pure pigment held in an oil and wax mixture. If you are not familiar with them I can recommend this book by Ruth Issett which is available from
ArtVanGo (along with the paintsticks)

Apply the paintick around the edge of your stencil. Apply generously and use more than one colour.

Now using a toothbrush (I recommend you use one just for this and not your husband's), brush the colour from around the edge of your stencil into the space on your page.

When you feel you have transferred enough colour, lift your stencil and your should be left with a clear strong image. You could of course do this onto a white page and then apply your water based paint. The paintstick will provide a wax resist as in the last sketchbook post.

You can then repeat the process on different parts of the page. If you use the same stencil without applying additional paint stick you get fainter, shadowy images. (I'm already thinking sheer fabrics here!)

If you don't have paint sticks you can still use the stencils with acrylic paints or some other thicker paint medium. Put your stencil back on the page as before.

Load up a brush (preferably a stencil brush which has a flat end) with paint and then remove any excess paint on a scrap of paper. Your brush should be quite dry.

And with quick jabbing movements apply the paint through your stencil.

Use more than one colour to create dappled shadowy effects.

When you've applied enough paint, lift your stencil and your image should be transferred to your sketchbook.

At this stage don't forget the piece of card you cut from your stencil, as this can be used as a mask. Stick it down on your page with masking tape or spray mount.

And using paint or paintsticks as before apply colour around your mask.

Lift off and you are left with a negative image.

I also quite like the effect of the paint on the mask and think this might get stuck into my sketchbook too!
 First of all colour some pages in preparation. I've used some spent procion dye for this but any water based medium will work. Then you need to select a strong image from your previous pages that can be reduced to an outine shape. Draw this into some card. Cereal packet weight will be fine. If you want to do a lot of stencilling then it's worth cutting your stencils from acetate sheets but I find card works well enough for a few applications.
 Carefully cut around your outline. It's worth doing this carefully because then you can use the cut out shape too.
 Position your stencil onto the page. I use a little bit of spray mount to hold it in position because I never seem to be able to stop the stencil slipping if I try to hold it in place, although I'm sure some masking tape would work too.
 For the first exercise I've used Markal paintsticks (Shiva sticks) which are pure pigment held in an oil and wax mixture. If you are not familiar with them I can recommend this book by Ruth Issett which is available from ArtVanGo (along with the paintsticks)
 Apply the paintick around the edge of your stencil. Apply generously and use more than one colour.
 Now using a toothbrush (I recommend you use one just for this and not your husband's), brush the colour from around the edge of your stencil into the space on your page.
 When you feel you have transferred enough colour, lift your stencil and your should be left with a clear strong image. You could of course do this onto a white page and then apply your water based paint. The paintstick will provide a wax resist as in the last sketchbook post.
 You can then repeat the process on different parts of the page. If you use the same stencil without applying additional paint stick you get fainter, shadowy images. (I'm already thinking sheer fabrics here!)
 If you don't have paint sticks you can still use the stencils with acrylic paints or some other thicker paint medium. Put your stencil back on the page as before.
 Load up a brush (preferably a stencil brush which has a flat end) with paint and then remove any excess paint on a scrap of paper. Your brush should be quite dry.
 And with quick jabbing movements apply the paint through your stencil.
 Use more than one colour to create dappled shadowy effects.
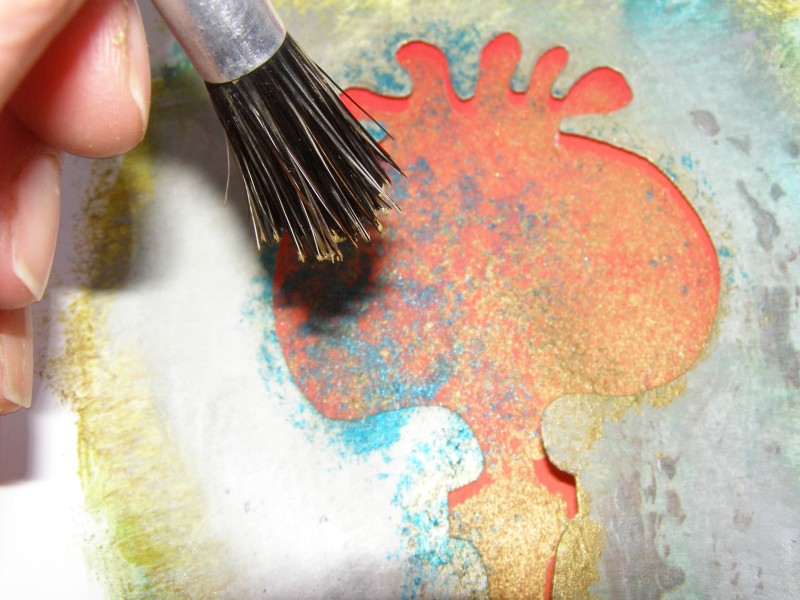 When you've applied enough paint, lift your stencil and your image should be transferred to your sketchbook.
 At this stage don't forget the piece of card you cut from your stencil, as this can be used as a mask. Stick it down on your page with masking tape or spray mount.
 And using paint or paintsticks as before apply colour around your mask.
 Lift off and you are left with a negative image.
 I also quite like the effect of the paint on the mask and think this might get stuck into my sketchbook too!


i should go shopping with you! More great ideas, I'm going to try them all soon, and Put the work on my blog. Thank you.
ReplyDeleteThat is so clever - your sketches always look fabulous - thanks for sharing with us.
ReplyDeleteVery pretty work. I like the first sample using the toothbrush best.
ReplyDeleteI can't believe you spent so little at the FOQ I'm going on Sunday and I just know I won't show you restraint. Oh to be good.
Well that is restrained, you have willpower don't you? Only £6.50.
ReplyDeleteLike the previous comment I like the markel sticks too! I must remember not to use Dave's toothbrush.....
I just love your poppies! That's my theme at the moment. How good are they! I live in the largest legal poppy growing region in the world.
ReplyDeleteThanks for a new view.
hugz
Sally
can't wait for my poppies this summer - have some art to make :)
ReplyDeletegreat instructions again - i bought a new pad of good paper this week !
Such restraint! Well done. Another lovely sketchbook exercise. I have some very old Markal Sticks - I wonder if they still work?
ReplyDeleteLove the paintsticks and toothbrush exercise, great image!
ReplyDeleteWell done on not spending too much!
Vivienne x
I liked the mask too...... :O)
ReplyDeleteAnother lovely post. However did you manage to spend so little - I am now in awe of your willpower as well as your creativity! x
ReplyDeleteI love using Markal sticks to, I got mine a long time ago from Art Van Go after a demonstration by the company in my embroidery class. I used them to make an Italian quilted picture of leek heads before they open on pink silk dip dyed in potassium permanganate.
ReplyDeletehttp://www.flickr.com/photos/24585238@N00/1574143370/in/set-72157602426628515/lightbox/
The leek heads are the ones on the left, sorry the photo is small.
Hi Gina,
ReplyDeleteI thought quilt show was amazing and I could not believe how busy it was.
I spent more than I should!
I did see your sketch book on the Opus stand but sadly could not see you.
Ooooh, very nice Gina! I particularly like that blue and gold pouncy method!
ReplyDeleteGina you've given me a brilliant idea for something to do with Em in a "bored" moment not that we've had many of those this holiday. Thank you and I love your stencilling. jane
ReplyDeleteYou make it look soooo easy!
ReplyDeleteBeautiful work. I'm loving your sketchbook series :o)
ReplyDeleteThe poppy pods are so cool and that bonnet is really sweet. Especially the heart on the back.
ReplyDeleteSince you have ignored my attempts to lure you to Scotland to be a C&G tutor, this sketchbook series is a wonderful taste of what it would be like! Thank you so much - and wouldn't it make a nice book?!
ReplyDelete