Long time readers will know that as well as a bit of embroidery I also like to dabble with some book making. Over the summer I taught a one day class making these pretty little albums and afterwards I was asked if I could produce an on line tutorial. I'd like to tell you I had made a wonderful video that you could follow step by step but I haven't! I have however spent hours analysing, photographing, drawing and writing the whole process out step by step to make a downloadable fully illustrated PDF that is now available to buy from my Etsy shop. I will say now that I didn't invent this book structure but I learned how to do it from a fabulous print maker and teacher called Heather Power. I don't know whether Heather invented it or whether she learned it from someone else, but it was part of a weekend bookmaking with Heather and I was never given any notes, so the tutorial is all my own work.

But before I possibly tempt you to buy yourself a copy, I thought I would do a free tutorial here for a simple variation of a pamphlet book, that is one of my favourite little books to make.

To make one of these little books, perfect for notes and quick sketches you will need:
Sheets of cartridge paper for the pages - enough to make 4-8 sheets 10cm x 20 cm (4" x 8")
A piece of water colour paper or light card 10.5cm x 25cm (4.5" x 10")
Some decorative paper (optional)
A craft knife, a metal ruler, a tapestry (blunt) needle, strong thread, a glue stick, a map pin and an old tea towel

First of all tear your cartridge paper into the correct size for the pages. I do this against a metal ruler and prefer to tear rather than cut as it gives a deckled edge to the pages. It doesn't matter so much then if they don't quite line up.

Then fold each in half and make two nests of 2-4 pages, depending on the thickness of your paper. These 'nests' or groups of pages are called signatures.

Now take your water colour paper or card for the cover and fold this in half too. Measure 2cm (1") in from the folded edge and fold the cover back on itself.

Do this on both sides so you end up with a W effect, as shown in the photo.

Now take your two signatures and put one into each fold of the W as shown.

You then want to fold the covers out flat whilst keeping the fold of the signatures tucked against the folds of the covers as shown... this is the stage where I realised having a different colour cover might have been useful for the sake of the photos. But I'm not doing it again!

Hopefully the diagram will make it seem clearer (The shaded bit is the cover)

You are now going to stitch the two signatures and the cover together in one quick manoeuvre along the fold using a simple pamphlet stitch.

Along the fold mark three dots, one in the centre and two either side an equal distance apart from the centre. Using a map pin and with the whole thing resting on an old tea towel push holes where you have made the dots.

Thread a rounded needle with about 40cm (16") of strong thread and take it through the centre hole, leaving a tail of thread for tying off later. On the other side take the thread up and through the top hole.

Now take it straight back down to the bottom hole, missing the middle hole.
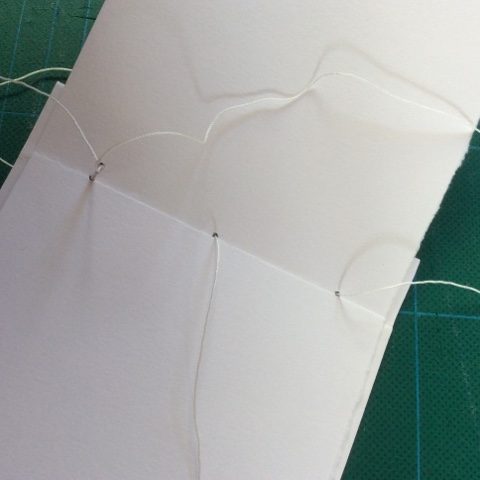
And finally back through the middle hole coming out on the other side of the long stitch that runs down the centre.

You should have two ends either side of the central long stitch, which you can now tie off and trim.

The diagram shows the order of stitching... in the centre, down to one end, back to the other end and then back out the centre.

All you need to do now is fold your covers back to the outside and you should have a neat little two signature pamphlet book!

I then decorated the cover with nine little squares of wrapping paper. You may have noticed the first book had little squares from the inside of envelopes. But of course you can decorate it any way you like or use coloured or patterned card for the cover. If you make one I'd love to see how it turns out!

And should you wish to make a slightly more complicated book the twenty page fully illustrated tutorial is available from my etsy shop here. And thank you to Catriona for testing this for me. Her response was "Very clear instructions... the pattern is a winner" so I hope that might encourage you to give it a try.

And something I forgot to mention the other day... I will be making one of these books for every single person who comes along on my block printing India trip with me next year. A little gift from me to say thank you and to hopefully inspire some sketches while we are there!


Thankk you Gina for choosing me to trial the pattern-it was such a lovely project. Looking forward to trying the mini-make-I’m thinking Ch******s gifts??
ReplyDeleteThank you for volunteering! They do make lovely gifts.
DeleteAwe ... they are lovely little books Gina!!
ReplyDeleteThank you Vivienne x
DeleteI have always admired book builders . . . I've tried it a couple of times but have never had the drive to stick with it. These are lovely.
ReplyDeleteKeep Smiling!
Connie :)
You should give these simple little pamphlets a try. Very easy but with lovely results.
DeleteThank you for the free tutorial - I haven't tried this method but like the look of it. The more complicated binding looks very smart.
ReplyDeleteYou're welcome Heather. Easy but effective!
DeleteI really want to do this! Thanks for such a great tutorial. If I manage the pamphlet, I might go on to a larger book.
ReplyDeleteLet me know how you get on!
DeleteThank you for your very clear and detailed instructions Gina x
ReplyDeleteMy pleasure!
DeleteI always think I should like to make one but I am sure that my weak wrists and hands would preclude me from even trying.
ReplyDeleteI am not enamoured of the ageing process you know!
I'm not sure that too much strength is required... just a little dexterity!
DeleteYour notebooks are lovely. The only ones I've made were just folded sheets of paper. I think I was about six!
ReplyDeleteThank you Liz!
Delete